

You need to have a HP-QC user-id in order to log in. Once you are logged in to HPQC do the following:
Step 1. From any Quality Center Module, select Menu Item Tools > Customize
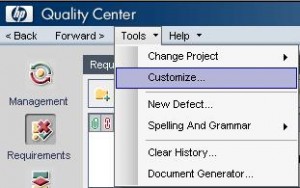
The Quality Center – Project Customization screen appears after you select Menu Item Tools > Customize
![]()
Step 2. Select User Properties option.
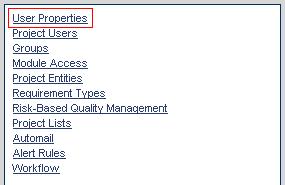
NOTE : The list options depends on the Quality Center access privileges that your user account have. All users can use this option to change their user properties and password.
Step 3. In the User Property screen you will have to fill up the fields Full Name, E-Mail, Phone Number and Description with the required information.
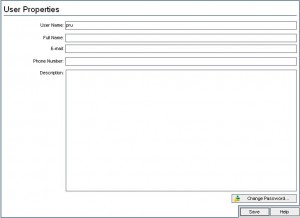
Email information is very important because it enables you to receive email notifications and alerts directly to you mailbox, for example when a requirement is assigned to you or when a defects that you reported have been fixed.
Step 4. Click Change Password button
![]()
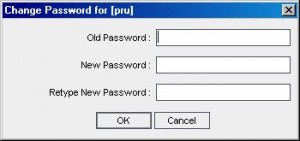
That will brings up the Change Password for [your Quality Center User ] dialog box, in this case [pru].
On the window shown below, enter your old and new passwords and hit the OK button to save your changes.
The change password dialog box closes. In the next dialog box click Save Button to keep the changes.
The Information window appear after clicking Save Button
Click OK button ![]()
On the upper-right side of the window, click the Return button ![]() to exit the Project Customization window and return to your project.
to exit the Project Customization window and return to your project.


 initiative
It’s very helpful to people.
Posted by jhansi | October 20, 2011, 11:52 amIts really very helpfull.I need step by step process of Q C of all modules and its navigations.Thanks
Posted by vishal | October 21, 2011, 1:20 amSimple, quick and extremely useful.
Posted by Venkatagiri Vatlam | April 19, 2013, 2:44 pmThanks for such a clear information with pictures.
Posted by sohaib | July 18, 2013, 10:02 am